Some much needed vitamin sea

Sunrise in St. Mary’s, Georgia

We spent a long weekend on the Georgia coast exploring St. Mary’s and Cumberland Island. A four day dose of vitamin sea is exactly what my spirit needed. I’m so thankful Hurricanes Helene and Milton did not cause extensive damage to Cumberland Island. Can you believe it’s been almost two years since I last laid eyes on the Atlantic Ocean or the waters of the Gulf of Mexico? Much too long!

Visiting Cumberland Island National Seashore has long been on my bucket list. This long-time Georgia resident has been to the islands of Skidaway, Jekyll and St. Simon’s, but never ventured this far south. We spent a full day on the island, which was plenty of time for us. The National Park Service also allows tent camping for up to 7 days (not me!). The island’s history is so rich and the day long tour only began to scratch the surface.

Of course, I visited the two quilt shops in Kingsland – The Scrappy Rooster and Beyond Fabric. The Scrappy Rooster is strictly a quilt shop while Beyond Fabric does everything from quilting to garment sewing to crafts to home dec. Honestly, if you need some off-the-wall, obscure sewing/crafting doo-dad, chances are Beyond Fabric has it! There’s also a wonderful bookstore in St. Mary’s – Once Upon a Bookseller.

I’m thinking a trip to the Quilted Cow in Gulf Shores, AL and a trip to the 2025 AQS Show in Daytona Beach are in my future!

Want to sew, but not in the mood to make a quilt?

Quilting is fun, but it takes time to complete a quilt. Occasionally, I want a quick finish project to keep me motivated. Yes, I have patterns/tutorials on hand for placemats, potholders, bowl cozies, coasters, drawstring bags and zipper pouches, but sometimes I want something different. Thought I’d share my go-to websites for quick project inspiration (usually free to download).

Moda Bake Shop – use the buttons on the left sidebar to drill down to the type of project you want

Riley Blake Designs – go to the Free Patterns tab and then Sewing Patterns to access project patterns.
(Tip: check the updates tab to see if there are any pattern corrections to your project)

Fabric Editions – click the Projects tab and scroll down to the category of project you want to make.
(Tip: sewing and fabric shops use many of these project ideas in their classes)

We All Sew (sponsored by Bernina) – click on the Projects tab to access different project categories.

Sew 4 Home (sponsored by Janome Canada) – click on Inspire tab and then Sew4Home (also look at Project and Canadian Designers tab for some great options).

JKQuilts – click on Resources and scroll down to Free Patterns to find a wide variety of projects
(Tip: sign up for their monthly newsletter to get free, well-written patterns designed by the shop’s own staff).

Sewcanshe – click on Free Patterns tab.

Apple Green Cottage – close out the pop-up window and scroll down the page to access free patterns.

There’s also Pinterest, Etsy and probably your fave YouTube sewist/crafter that I didn’t mention here. One caveat about Etsy: some patterns are poorly written. If you aren’t familiar with the designer, read customer reviews and see if the pattern is available for sale elsewhere, as well.

A series of three storage pods made using a free pattern from Fabric Editions.
Storage pods made 3 different ways using free pattern from Fabric Editions.

Left – fusible fleece on outer fabric only with SF-101 fusible interfacing on lining.
Center – one piece of lightweight foam in middle (non fusible) – came as a kit with pattern
Right – fusible fleece on outer fabric only

My fave version is the one with the foam; however, I’d use single sided fusible foam to reduce fabric slippage when sewing. If you are a beginner sewist, I highly recommend using the fusible products in the LEFT version. It’ll be much easier to sew and you’ll be very happy with the results.

Need a budget-friendly option to quickly cut strips, squares and rectangles?

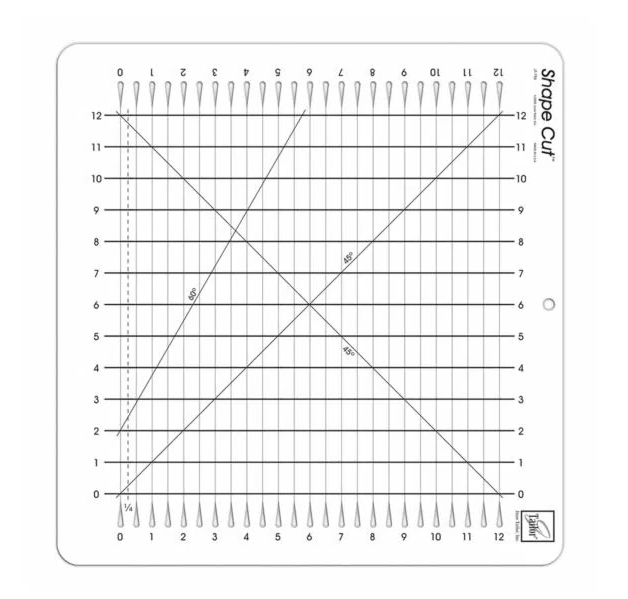
Meet my old friend – the June Tailor Shape Cut ruler. I was introduced to her when I took my first quilting class many moons ago.

A photo showing the Shape Cut ruler from June Tailor.

This is the basic model (JT-796), which can cut strips up to 12″ wide. The cutting slits are marked every 1/2″, so I can easily cut in whole and 1/2″ increments. You can often find this ruler on sale @ Joann or Wal-Mart for about $25.00. Similar rulers are also available on Amazon under a variety of brand names. Just be aware that slit cut/slotted rulers are more flexible than a traditional acrylic quilting ruler. There’s also a similar product called Stripology rulers marketed by Creative Grids. It’s a good product, but much more expensive.

Remember, we’re on a budget here. This $25 ruler will allow you to achieve the same basic functions. The key is to learn how to use the ruler, plus a couple of ruler hacks:

(1) Watch the instructional video distributed by AccuQuilt/June Tailor. (AccuQuilt bought June Tailor in 2023.)
(2) Watch this video from Fat Quarter Shop. The demo uses the Stripology ruler; however many of the same principles apply to all slit cut rulers. I found the part on sub-cutting especially helpful. It is about the 6:15 minute mark in the video.

What if you need to cut strips in 1/4″ or 3/4″ increments? There’s a hack for that, but it depends on which version of the ruler you have. Your 1/4″ line will either be to the left or right of the 0 cutting slit. If your version is like mine with 1/4″ and 3/4″ lines to the LEFT of the 0 cutting slit, I HIGHLY recommend you download and print-out the cutting chart referenced in the Fat Quarter Shop video. These directions work well with this version of the ruler.

Photo showing offset lines for cutting 1/4" and 3/4" strips with June Tailor ruler.
My Shape Cut showing 1/4″ and 3/4″ cutting lines to the left of the 0 cutting slit.

If you have a version which has a dashed 1/4″ line to the RIGHT of the 0 cutting slit, watch this video and reference the cutting chart in the instructions found here. I’ve only found this configuration on the XL version of the ruler in my local shops, although the official AccuQuilt videos and online product literature show the regular version as having the dashed 1/4″ line to the right. Perhaps a product redesign is coming to market soon? Regardless, check which version you have before making any cuts.

Product photo from AccuQuilt site showing 1/4″ line to the right of the 0 cutting slit.

You will essentially make two passes to cut strips in 1/4″ and 3/4″ increments. Same thing applies to sub-cutting into squares and rectangles.. All you have to do is follow the steps on the chart and cut where indicated on each pass. Make sure you are using the appropriate cutting chart for your version of the Shape Cut ruler.

Even with a manual die cutting system, I keep a Shape Cut ruler in my ruler inventory. It’s a handy size and easy to transport to classes/retreats. For small projects or those involving fat quarters, it’s often faster than getting out the Sizzix machine and corresponding AccuQuilt/Sizzix dies.

Tip: If you find you like using slit cut rulers, but want something more substantial like a traditional acrylic ruler, take a look at the Stripology products. They are a lot less “bendy” than the June Tailor versions. The ‘tweens at SQTM Summer Quilt Camp were much more confident with a rotary cutter when they used the Stripology (slit cut) ruler versus a regular quilting ruler.