BROKEN VIDEO LINK UPDATED 3/20/2012
Before Christmas, a coworker asked me to finish a Grandmother’s Flower Garden Quilt that had been quilted at least three decades earlier, but had never been bound because the family didn’t know how to handle the hexie edges of the quilt. I was handed a rolled up quilt sandwich exactly as it was taken from the quilt rack or when it left the quilter ages ago. Neither the backing, nor the batting had been trimmed away. The story goes that the quilt top was a wedding gift to the current owner’s great grandmother. The quilt was quilted at a later date and stored away. The current owner remembers the bundle sitting on a shelf in the closet when she was a small child (owner is now in her 30’s). My AQS fabric dating books pegged the majority of the fabrics to be 1930’s-1940’s with a few from the 50-60’s perhaps. After binding the quilt, I have a strong suspicion that at least two different people made the blocks for the quilt. The “curves” of the quilt are noticeably deeper in some places than others.
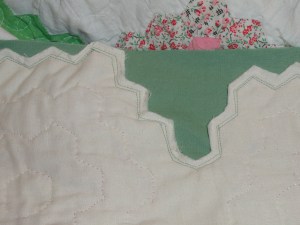
Here’s a picture of the back with the finished facing:

My first task was to figure out how to bind the darned thing. I took it to a quilt guild meeting to garner the collective wisdom of those much more experienced than me. A quilt appraiser happened to be there that evening and STRONGLY urged me to maintain the integrity of the quilt, including leaving the stains and the hexie edges (if at all possible) since the quilt was in such good shape.
- This meant doing a traditional bias binding on the edges, a facing or a knife edge finish.
- The next option was to “round” the hexie edges on the inner curves and do a pseudo scallop binding.
- The least desirable option was to
trim whack the quilt to a rectangular shape and bind the edges the usual way.
I tried the traditional bias binding with inner and outer mitered corners. I dutifully cut the binding on the bias at 2″. I machine stitched and took that out. I hand stitched. It looked like $%^ awful. A quilting board suggested using this video as a guide to make a facing for the quilt. Thank goodness for YouTube. This is the method I used. I won’t kid you in that it was as tedious as all get out to pivot & turn every 1-1/2″ but I think the results were well worth it. It is simply a wider traditional French fold binding. You measure the depth from the outermost point to the innermost curve. Add 1-2″ to this measurement plus desired seam allowances. Double this measurement. Cut strips this width and prepare just as you would traditional 2-1/2″ binding strips. My strips were cut 8 1/2″ wide and folded in half. I sewed the wider strip exactly as I would a traditional binding strip, following the edges of the hexagons. I did not miter the corners the traditional way. I did a version of a mitered border (looks like a picture frame with 45 degree angles in the orders). Snip, trim, fold and poke out. Press lightly along the edge. Stitch by hand. The picture below shows the stitching process. It looks weird, yet you line up the raw edges with the outermost points and pin securely. Then stitch 1/4″ away from the raw edge of the quilt. I had to watch the video 3x before I finally understood. It does work and my friend was so happy to finally have her family heirloom in a usable condition.