I was SEW excited to open my email and see this notice! It’s been five years since the Greater Atlanta Quilt Shop Hop disbanded. Many of those participating shops have gone out of business. Since then, Sadie and I have participated in the Middle Georgia Shop Hop every February. I also usually spend a 1/2 day at the Original Sewing and Quilt Expo held every March.
It’s wonderful to see ten shops listed, six of which I’ve never visited. Sadie and I will have fun catching all the shops over a long weekend – including a stay at Grandma and Poppy’s given the majority of the shops are on that side of town.
FYI – two of the large quilting and sewing shops in the area are not part of this event – which makes sense as this is designed to promote the smaller shops in the region.
Here’s the event homepage, so you can get all the details.
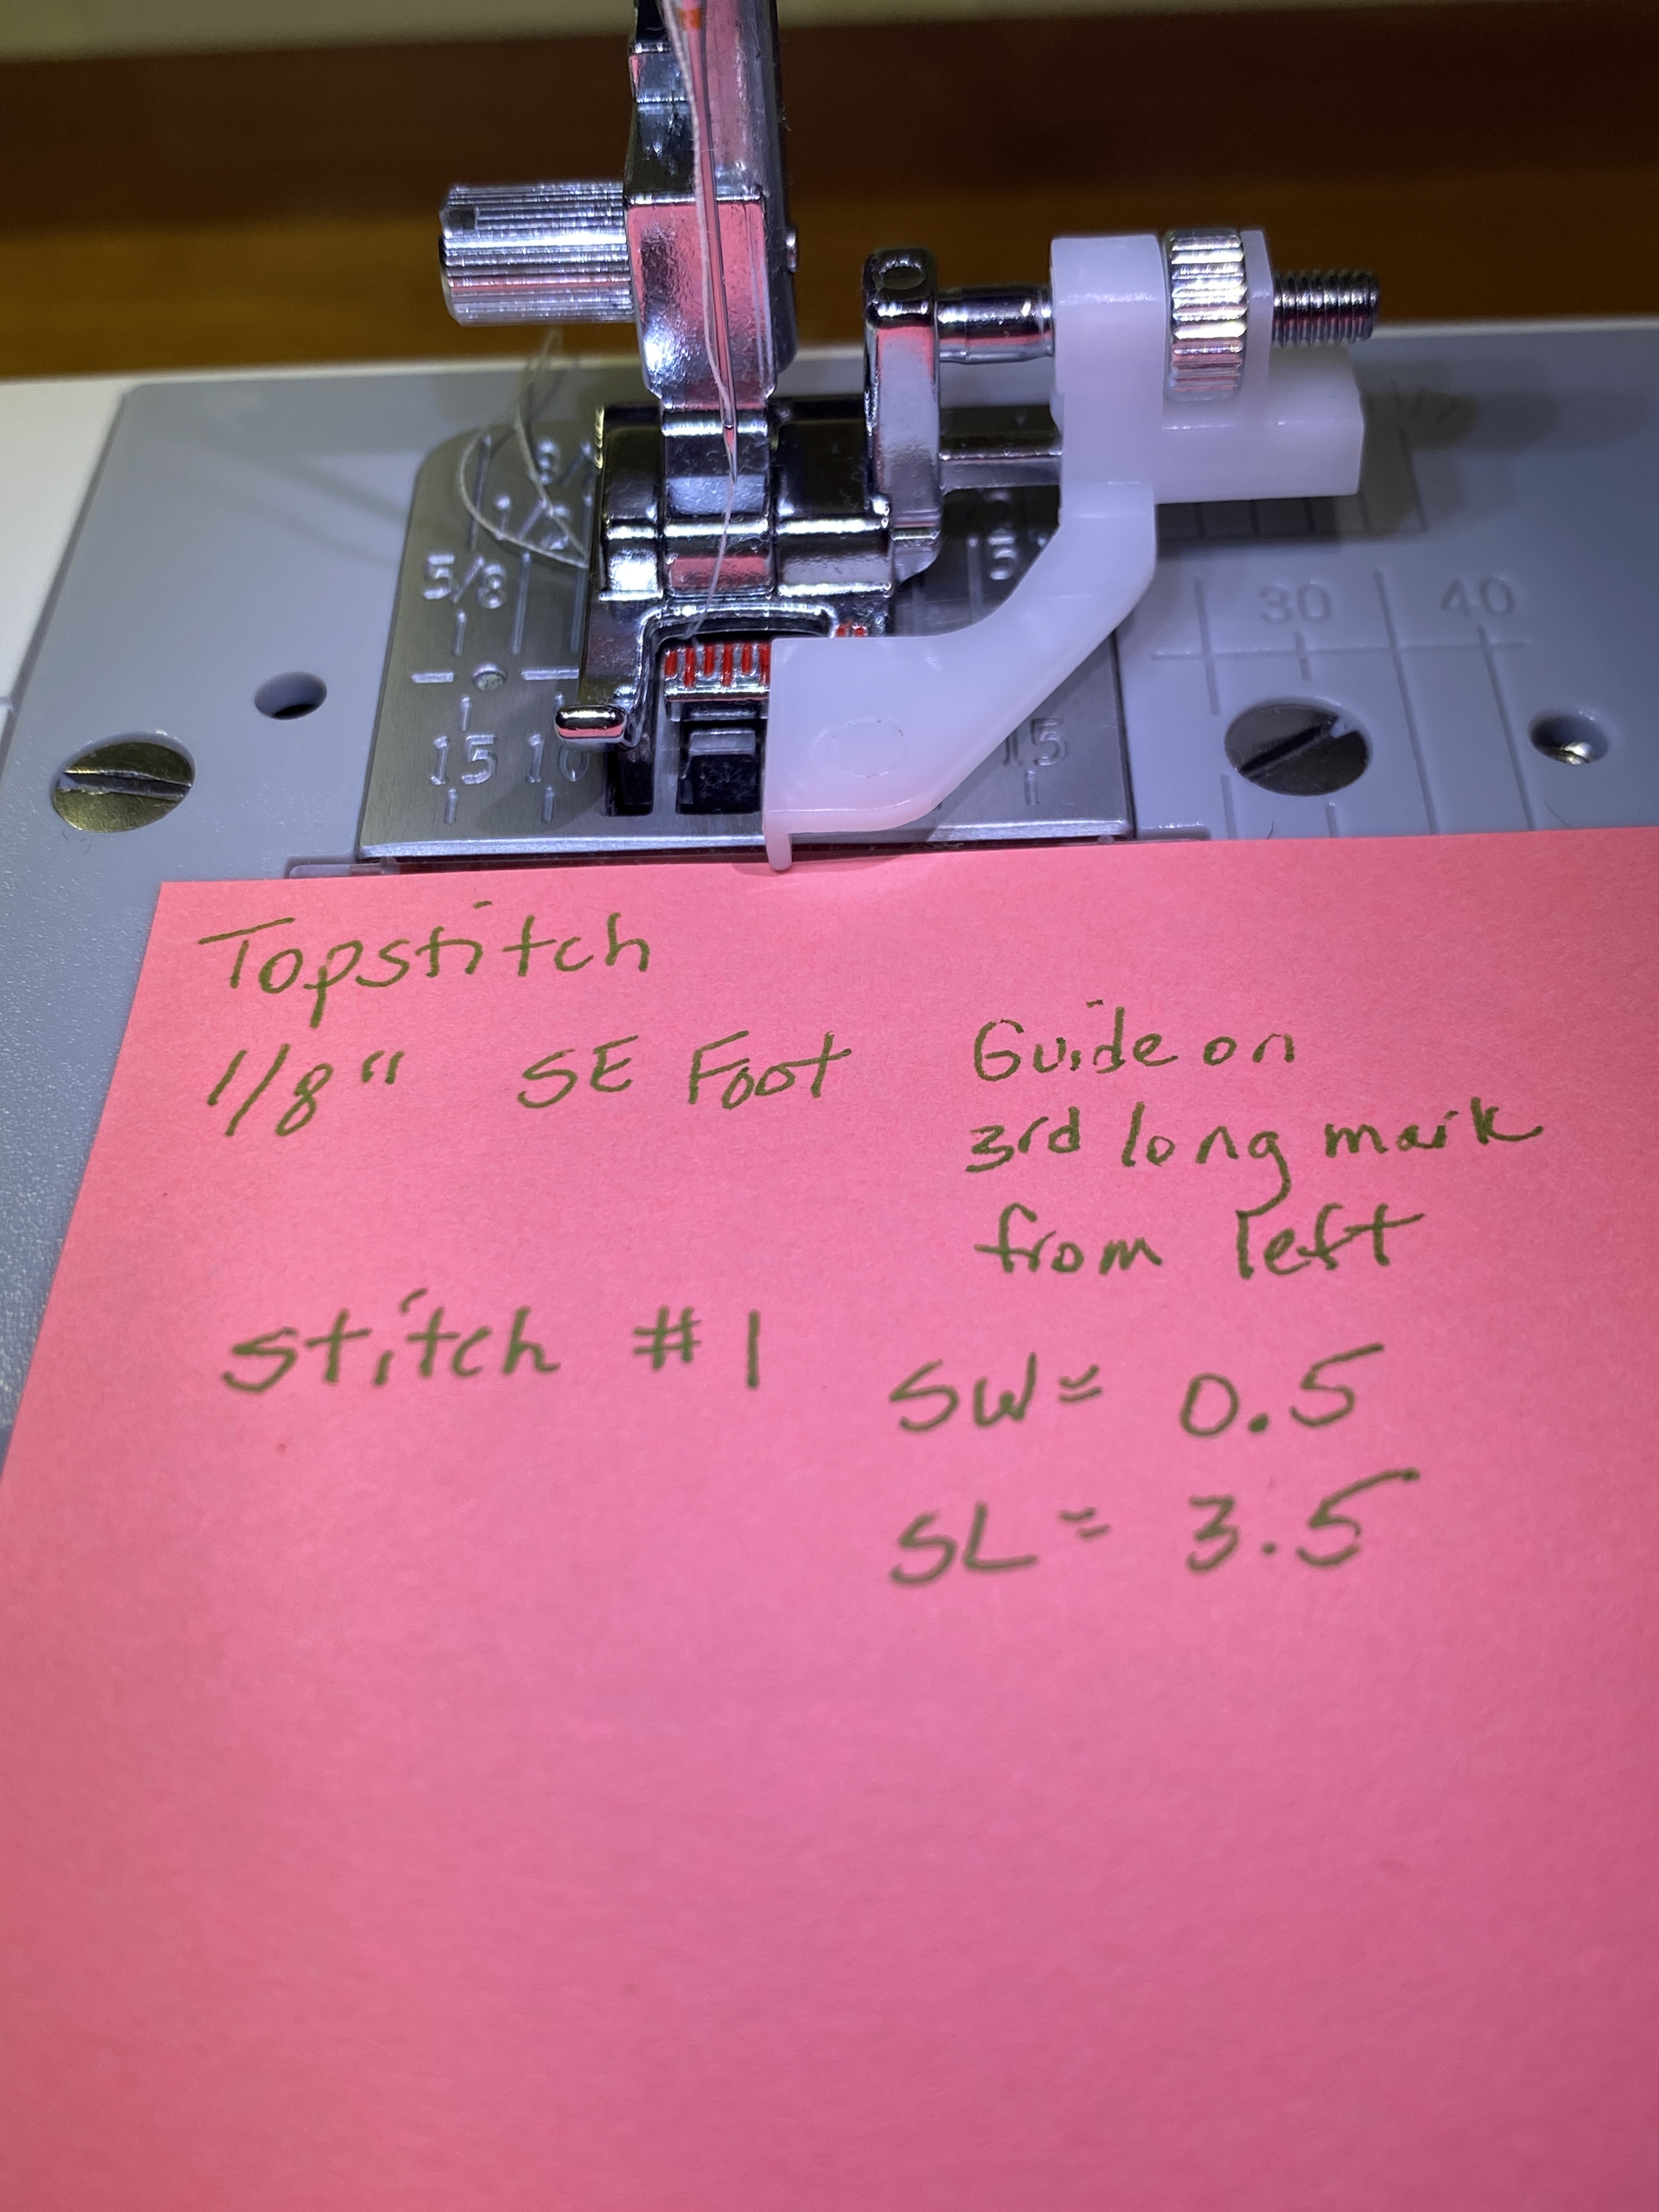
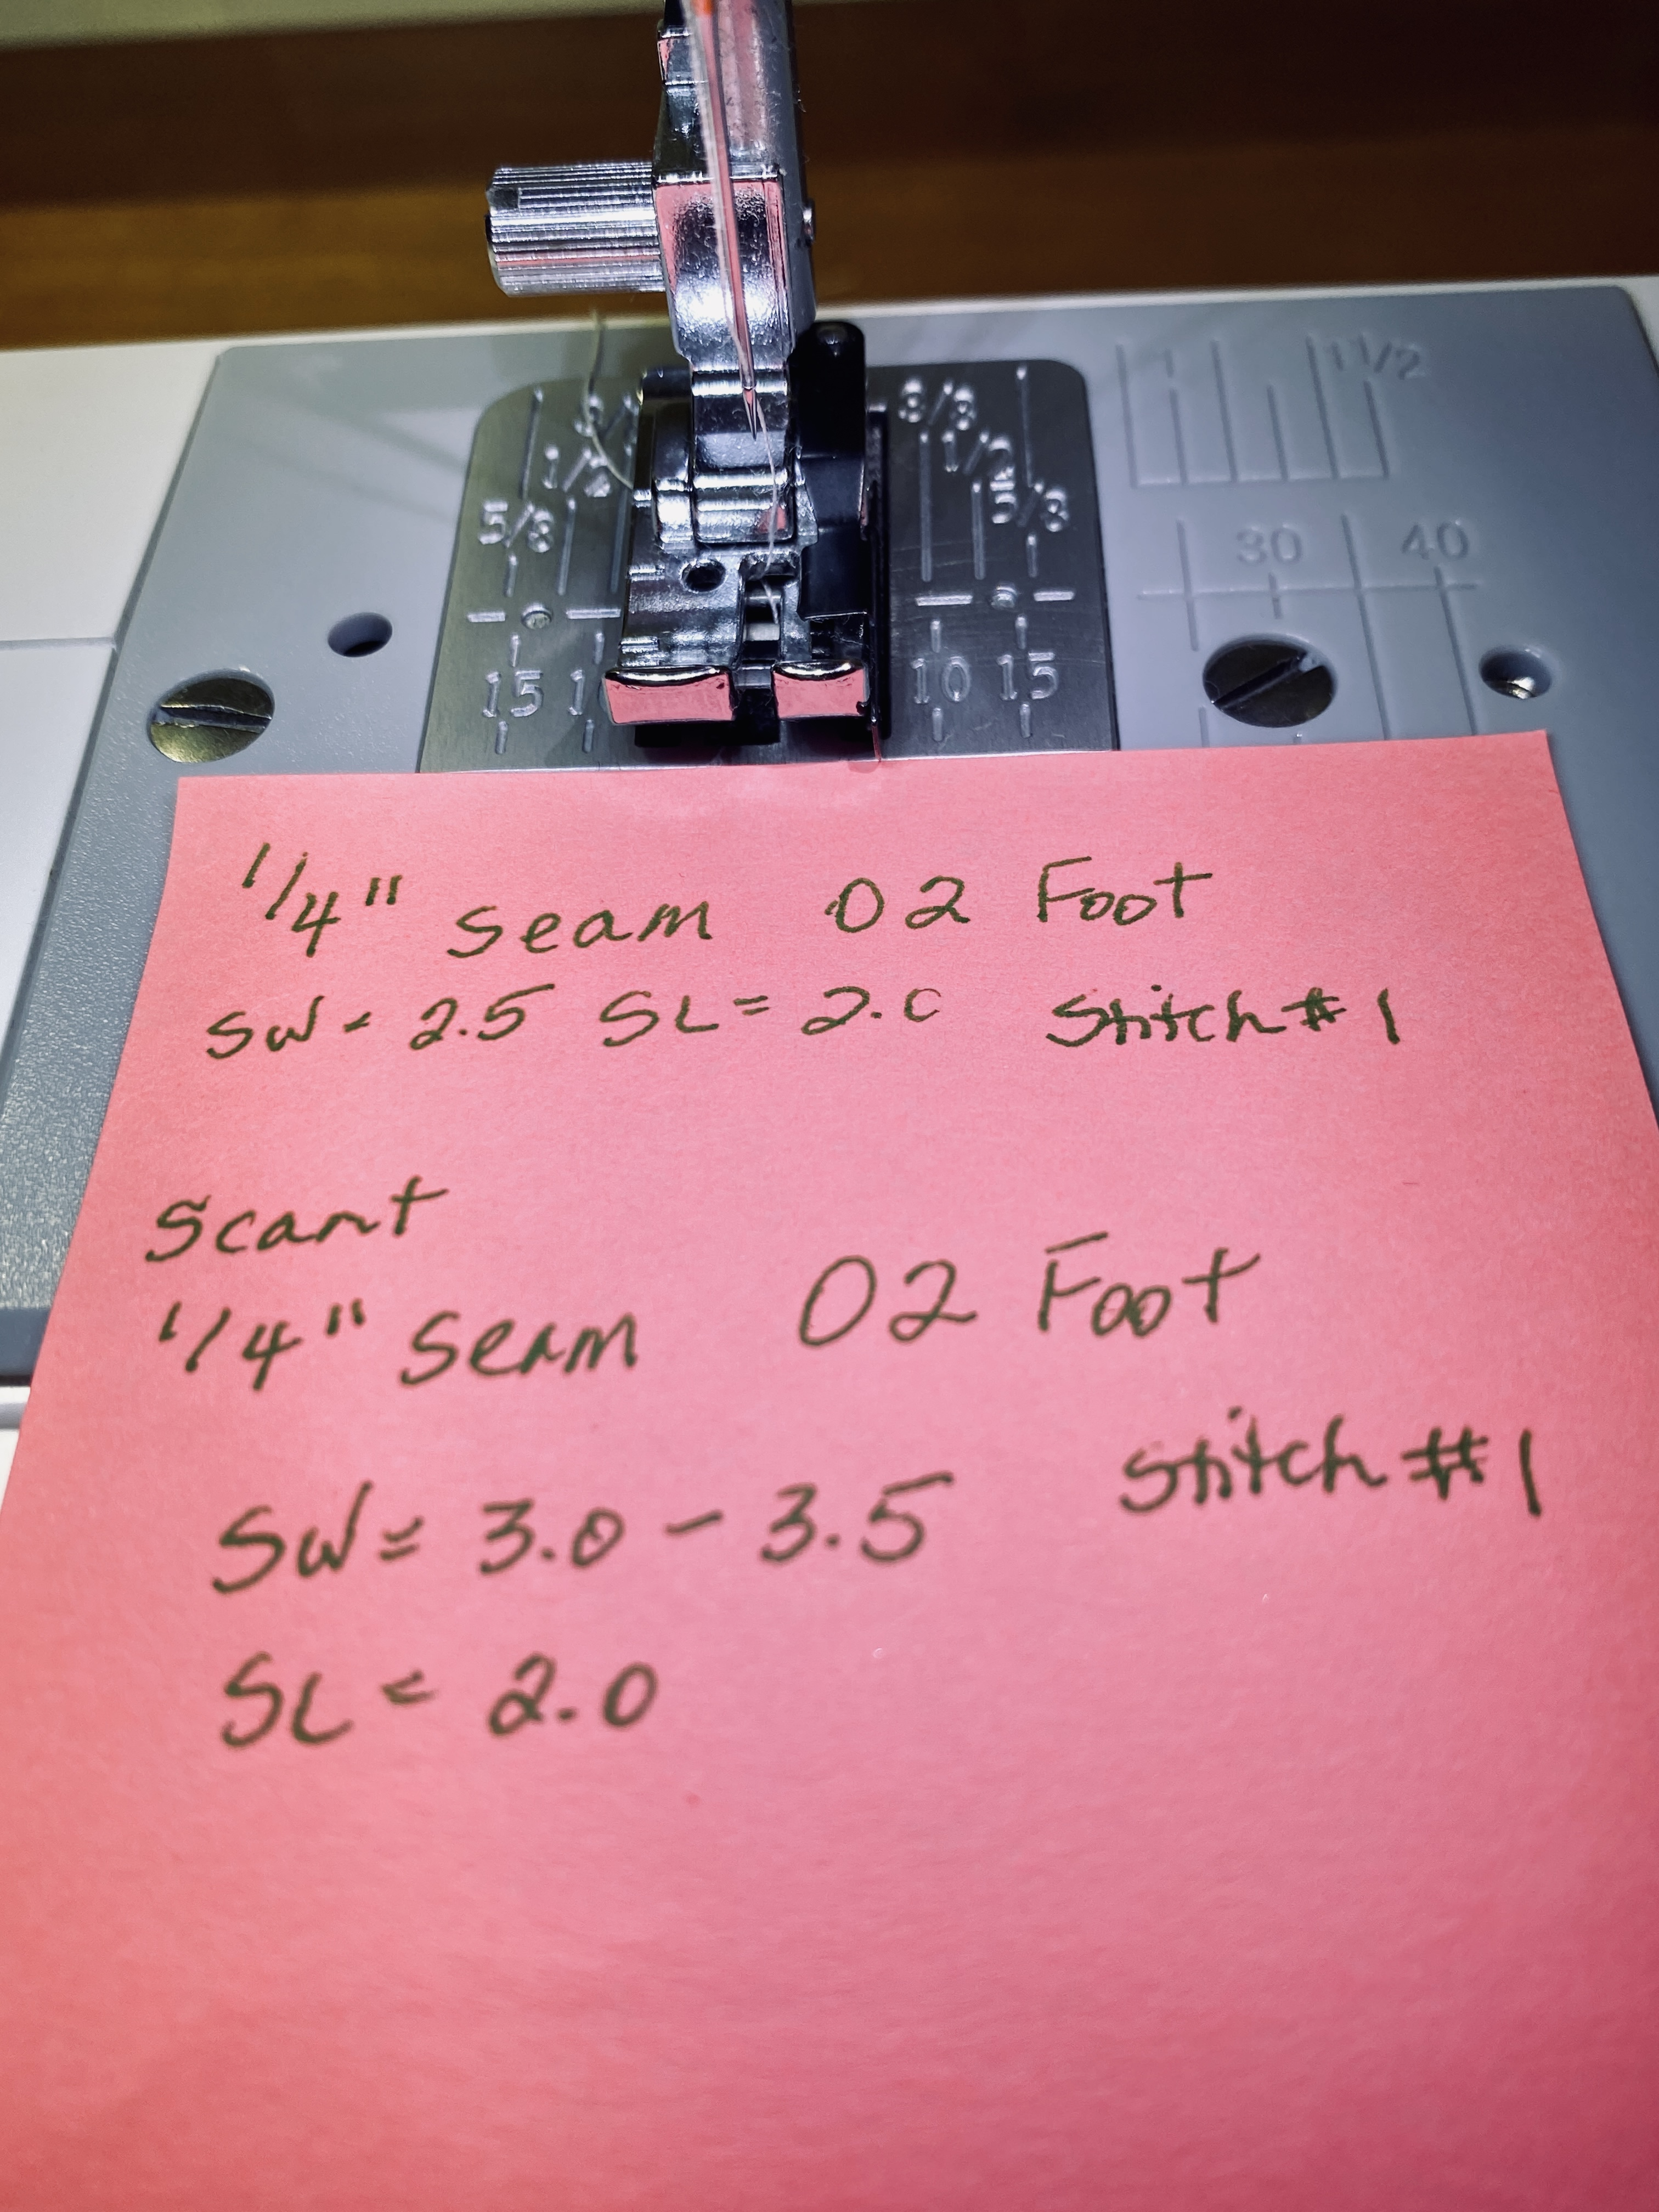
Accurate seam allowances play a vital role in the successful outcome of any project. A 1/4″ seam allowance is standard in quilting and most smaller sewn projects like zipper pouches and placemats. Topstitching is one of those little sewing extras that takes an item from homemade to handmade. If you make bags, zipper pouches, journal covers, placemats, fabric boxes, bookmarks, lanyards, etc., you’ll find find 1/8″ topstitching in your project.
What’s the best way to achieve consistent seam allowances and accurate topstitching? Experiment with the different feet that came with your machine. Practice, practice, practice.
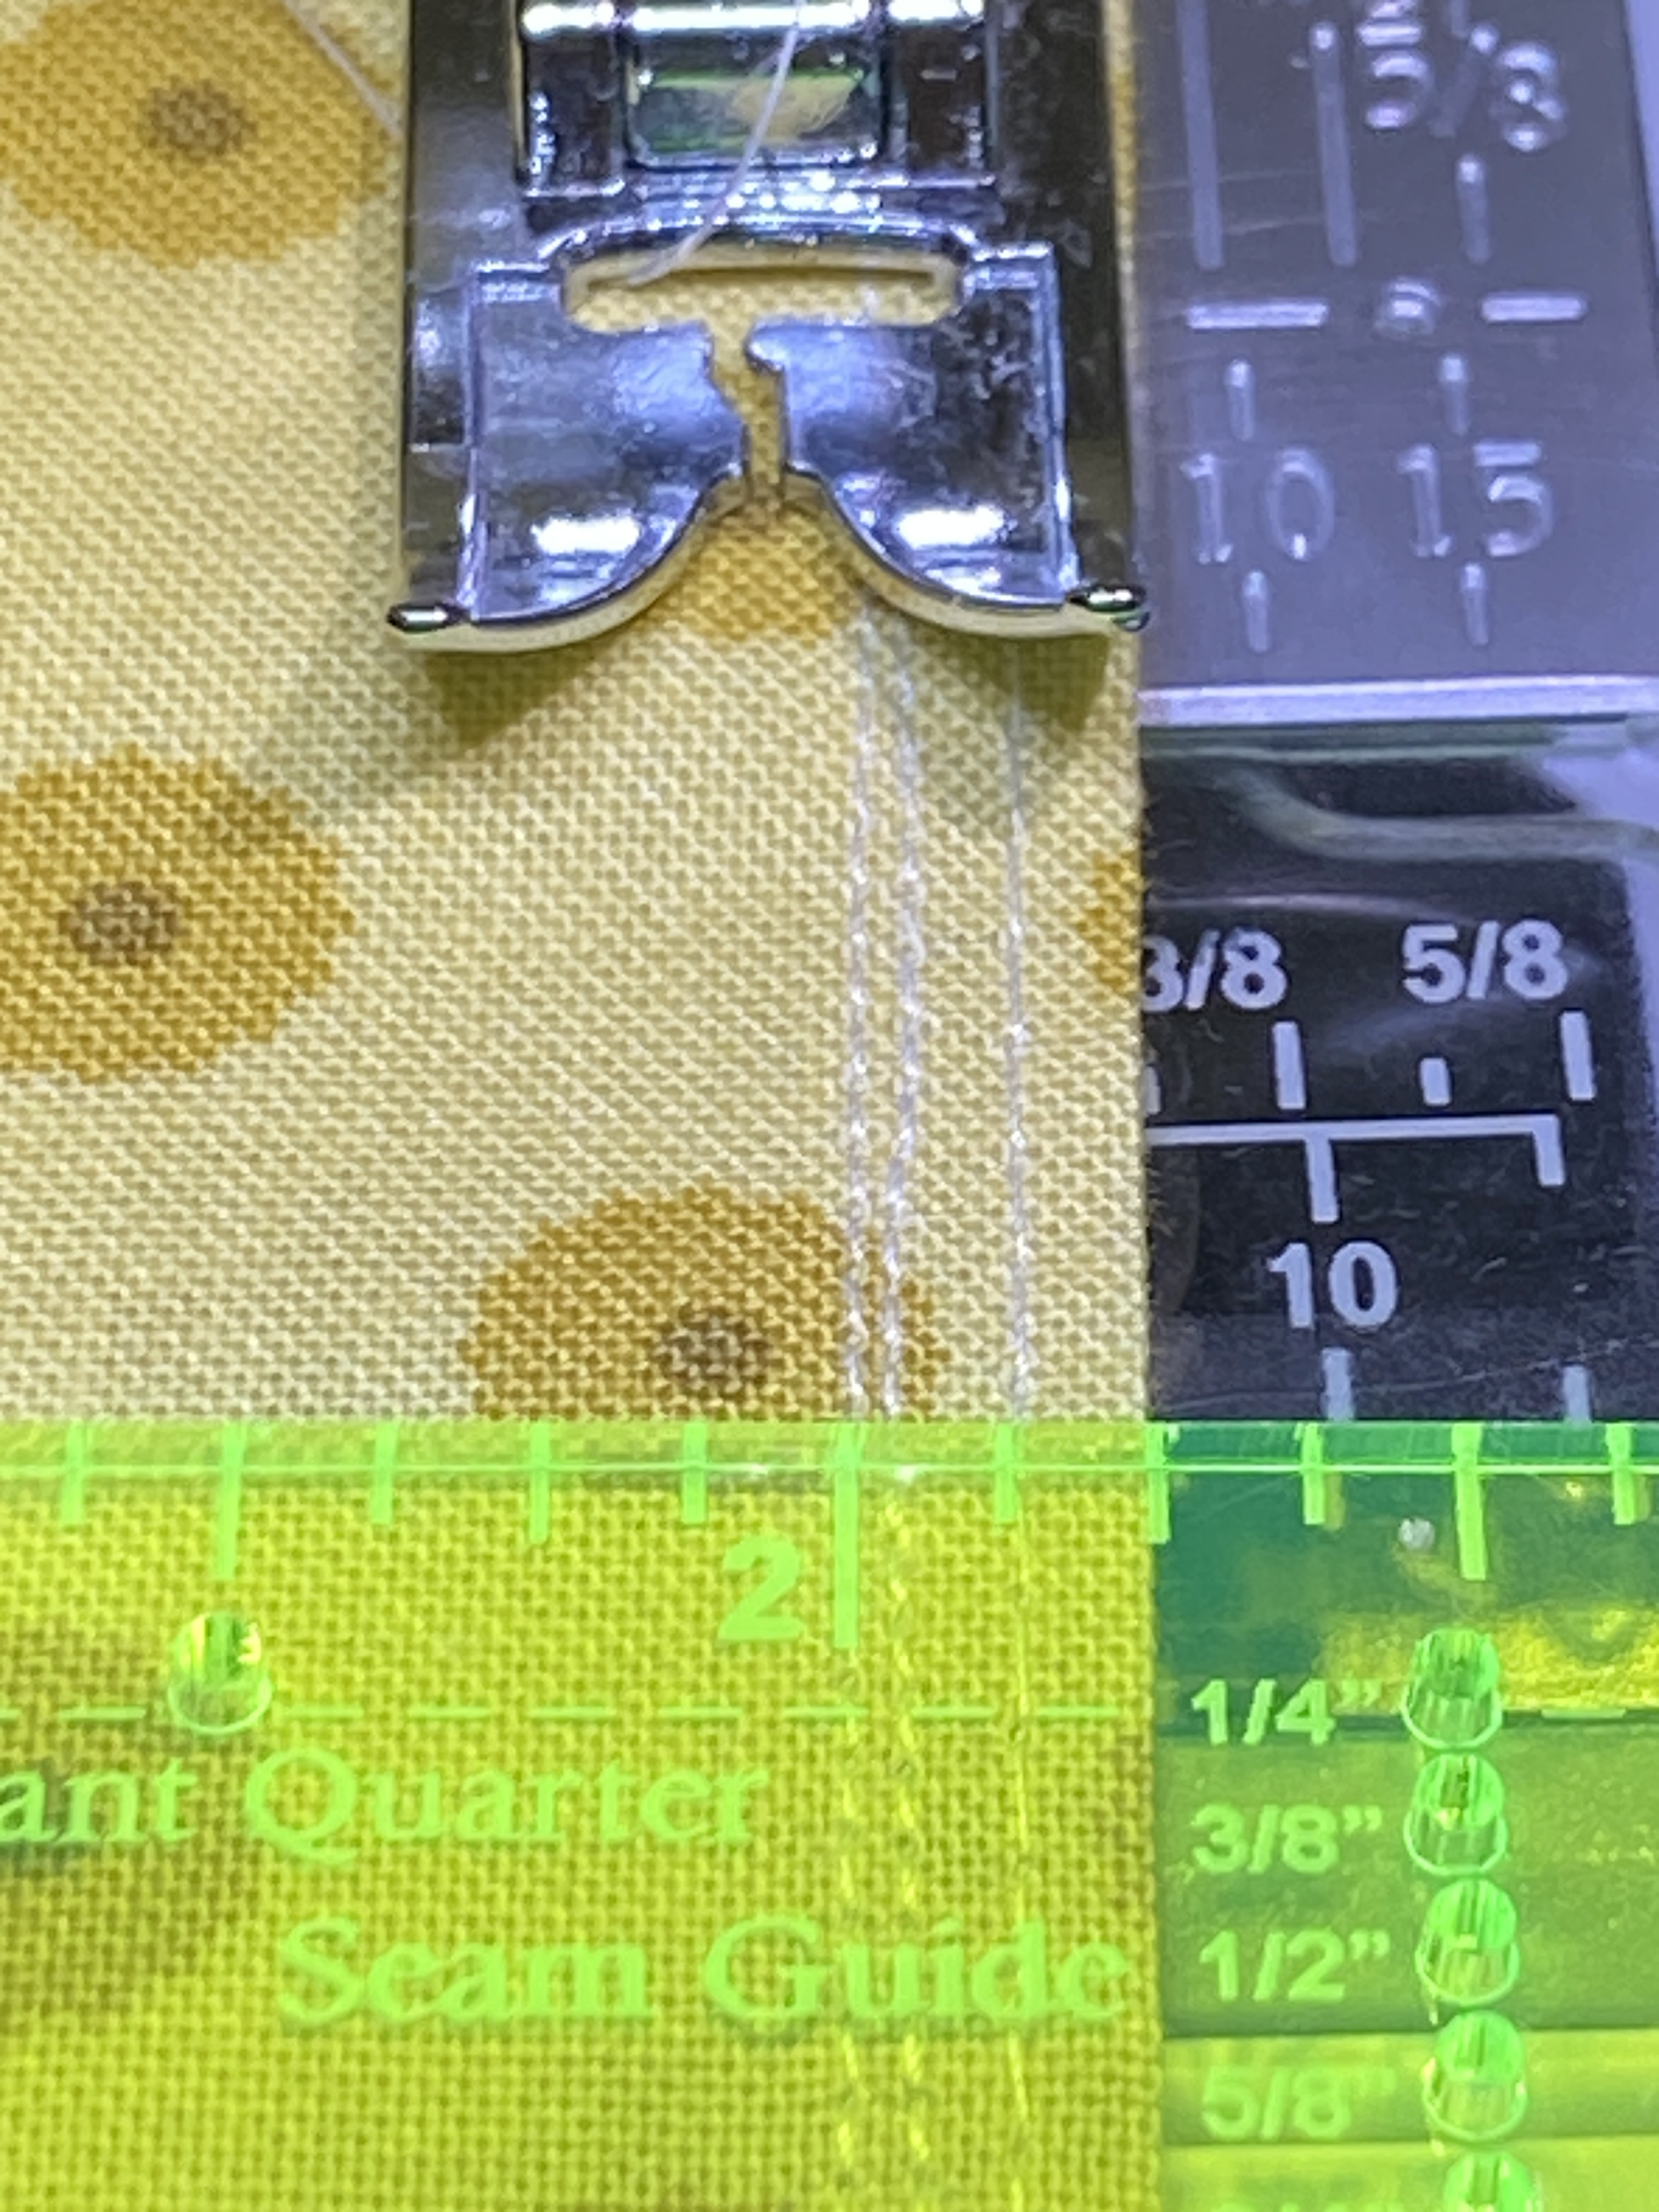
Perhaps your all-purpose presser foot looks like the one in this picture. Here, I’m showing a 1/4″ seam, scant 1/4″ seam and an 1/8″ topstitch. All were made using the foot that came with the machine. Use the edge of the presser foot as the guide for 1/4″ seams and adjust the needle position (change the stitch width) accordingly. Use a similar approach for 1/8″ topstitching, except use the inside right toe as your seam guide (long metal lip on the right side) and adjust the needle position.
My personal favorite, and most consistent means of 1/8″ topstitching, requires a specialty foot. Janome refers to this one as the SE foot, but it’s very similar to a common blindhem foot. Here’s a an earlier post where I discuss using the Janome G blind hem foot. The Elnita EC30 pictured here has a 5mm wide stitch width, and I find the SE foot easier to use than the adjustable blind hem foot demonstrated in that post.
For 1/4″ seams, I do best with a guide on the right side of my presser foot (similar to topstitching). The Janome 02 presser foot delivers consistent results.
These sticky notes will be pasted inside the front cover of my sewing machine manual. Having this info at my fingertips helps me make the most of my limited sewing time.
What about vintage straight stitch machines and modern mechanical machines where you can’t adjust the needle position on a straight stitch?
Use the original presser foot and painter’s tape on the machine bed to mark seam allowances.
Buy a 1/4″ presser foot for your machine. Can’t find one? The Little Foot works well.
Singer makes a Sew Easy foot with an adjustable guide. Using the inside toe as a guide with a center needle position yields a nice, consistent 1/8″ topstitch.
Experiment with the different feet and attachments out there to discover what works best for you. Another hack for vintage machines is use an old credit card along with the painter’s tape to mark seam allowances. This way you get a lip to run the edge of the fabric against and you can still use pins/clips up to a point. Beats having to pin everything to the left.
Thirty years ago, a wise old sewing machine repairman shared the following advice with me, “You don’t need a new machine, you need to learn how to use the one you have.” This was in response to me whining I really needed a new machine like the one he had for sale in his shop so I could do certain sewing techniques. My 60’s era Elna SU from the Atlanta Public Schools surplus is long gone; however, Mr. Vinson’s words still ring true in 2025.
Carefully curated social media plays right into our ongoing struggle with bright shiny object syndrome. Do you watch project tutorials from ambassadors of Baby Lock, Bernina and Janome sewing machines? Those machines they are using are the TOL machines. Same goes for all the sewists who whiz through things on their Juki machines. The really well known Juki users seem to be migrating toward industrial versions nowadays. While there is certainly educational content in the project tutorial, it’s also designed to sell you a new sewing machine or companion products.
Remember this: you do not need a fancy machine to make the same project. Look carefully. Most projects use use a straight stitch or zigzag stitch. Sure, fancy stitches might be used on a project, but you can just as easily substitute a different stitch on your machine or add ribbon and trim instead of fancy stitches. If doing applique, use a small zigazag instead of a blanket stitch. If you don’t have the curvy serpentine stitch that’s so popular right now, experiment with a 3-step zigzag stitch. Remember, the purpose of these tutorials showcasing the TOL machines is to SELL machines. Learn how to use the machine you already have.
How can you learn more about your sewing machine?
Read your sewing machine manual.
Watch instructional videos from the sewing machine company’s website or search YouTube for tutorials on your specific machine. Bet you’ll find more than one.
Make a stitch sampler. Stitch out about 6″ of each stitch on a piece of fabric. Adjust the stitch settings to see what you like best. Record them on a sticky note or directly on the stitch sampler.
Spend time each week trying out each presser foot that came with your machine. Figure out the best way to consistently topstitch 1/8″ from the edge and how to get a scant 1/4″ seam. Write those settings on a sticky note and put it on the front cover of your sewing machine manual for easy reference.
Visit the local dealer or sewing machine company website to see if there’s a hack, new foot or accessory that might make sewing easier or more enjoyable for you.
My helpful hint for those with the $88 Brother mechanical machine from the big box store: buy a walking foot. A number of students brought these machines to my kid’s sewing classes over the years. They are good for basic mending, piecing quilt blocks and sewing craft projects. However, my students struggled with the machine when it came time to sew anything more than two layers of quilting cotton – like a potholder or placemat. Adding a walking foot was an inexpensive solution.